HDDに問題が有ることが露呈してしまった自宅サーバですが、ブートにしか使っていないドライブですから稼働させている限り問題が起こることはありません。が、何かの理由で再起動した際に動かなくなると問題ですから、予防策として物理的に交換する前段まで準備しておきましょう。
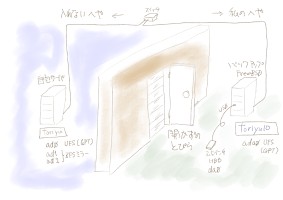
今回の作業の構成は下記のようになります。

物理的障壁により辿りつけない箇所にあるサーバのHDDをコピーしたいので、手元のFreeBSDにHDDをUSB接続して、そこにコピーを作成することにします。
まず、交換対象のHDDの中身について見てみます。
toriyu# gpart show ada0
=>       34  312581741  ada0  GPT  (149G)
         34        128     1  freebsd-boot  (64K)
        162   20971520     2  freebsd-ufs  (10G)
   20971682  167772160     3  freebsd-ufs  (80G)
  188743842  123837933        - free -  (59G)
FreeBSDをminimalインストールしたものが ada0p2 に入っていまして、起動する時にMBR的なものと /boot/kernel等 をロードするのに使っています。起動後はZFSに切り替わりますが、/boot からシンボリックリンクを張って ada0p2 の方の /boot にアクセスできるようにしています。ada0p1は gpart で書き込むブートコード、ada0p3 は中身を見てみましたが特に使っていないようなので今回はパス。ada0p2のみを複製の対象とします。
ということで、USB HDDアダプタを用いて新規のHDDを接続。ローカルとリモートのマシンがあり、なおかつデバイスがada0とda0というヤヤコシイ話になっているので間違えると悲惨です(^_^)。ここではローカルのコマンドラインは 黒字 で、リモートのコマンドラインを 青字 で記載しています。
# 離れた場所にある toriyu にログインしてから手元の toriyu10 にアクセスするので、toriyuがローカル、toriyu10がリモートという更によくわからんことになってます(^_^)
toriyu10# →ここでUSB HDDを接続
ugen2.2: <JMicron> at usbus2
umass0: <MSC Bulk-Only Transfer> on usbus2
umass0: SCSI over Bulk-Only; quirks = 0x4000
umass0:5:0:-1: Attached to scbus5
da0 at umass-sim0 bus 0 scbus5 target 0 lun 0
da0: <FUJITSU MHY2120BH 000C> Fixed Direct Access SCSI-2 device
da0: Serial Number 541048329357
da0: 40.000MB/s transfers
da0: 114473MB (234441648 512 byte sectors)
da0: quirks=0x2<NO_6_BYTE>
このHDDはどうやら Windows で使っていたらしく、NTFSが入っているみたいです。
toriyu10# gpart show da0
=>       63  234441585  da0  MBR  (112G)
         63       1985       - free -  (993K)
       2048    2097152    1  !39  (1.0G)
    2099200  104857600    2  ntfs  [active]  (50G)
  106956800   51394560    3  ntfs  (25G)
  158351360   50919424       - free -  (24G)
  209270784   25167872    4  !18  (12G)
  234438656       2992       - free -  (1.5M)
必要ないので消えてもらいます。
toriyu10# gpart destroy -F da0
da0 destroyed
toriyu10# gpart show da0
gpart: No such geom: da0.
で、GPTテーブルの作成から newfs まで。
toriyu10# gpart create -s GPT da0
da0 created
toriyu10# gpart bootcode -b /boot/pmbr da0
bootcode written to da0
toriyu10# gpart add -b 40 -s 88 -t freebsd-boot da0
da0p1 added
toriyu10# gpart bootcode -p /boot/gptboot -i 1 da0
toriyu10# gpart add -s 40G -t freebsd-ufs da0
da0p2 added
toriyu10# newfs /dev/da0p2
/dev/da0p2: 40960.0MB (83886080 sectors) block size 32768, fragment size 4096
using 66 cylinder groups of 626.09MB, 20035 blks, 80256 inodes.
super-block backups (for fsck_ffs -b #) at:
192, 1282432, 2564672, 3846912, 5129152, 6411392, 7693632, 8975872, 10258112,
11540352, 12822592, 14104832, 15387072, 16669312, 17951552, 19233792,
20516032, 21798272, 23080512, 24362752, 25644992, 26927232, 28209472,
29491712, 30773952, 32056192, 33338432, 34620672, 35902912, 37185152,
38467392, 39749632, 41031872, 42314112, 43596352, 44878592, 46160832,
47443072, 48725312, 50007552, 51289792, 52572032, 53854272, 55136512,
56418752, 57700992, 58983232, 60265472, 61547712, 62829952, 64112192,
65394432, 66676672, 67958912, 69241152, 70523392, 71805632, 73087872,
74370112, 75652352, 76934592, 78216832, 79499072, 80781312, 82063552, 83345792toriyu10# mount /dev/da0p2 /mnttoriyu10#
ローカル側からリモート側に dump して restore します。マニュアルを見ると gpart には backup とか restore という機能があるらしいのですが、今回は容量が違うので レベル0ダンプと restore を使います。なお、必ずしも umount しなくてはならないことはないのですが、mount状態で強行する理由もないので一旦取り外しています。旧来のMBRだとumount出来ないので、その場合は dump 時に-L を付ければ良かったかと思います(うろ覚え)。
toriyu# sync
toriyu# umount /dev/ada0p2
toriyu# dump -0auf - /dev/ada0p2 | ssh toriyu10 "cd /mnt;restore -rf - "
DUMP: Date of this level 0 dump: Wed Apr 13 11:52:12 2016
DUMP: Date of last level 0 dump: the epoch
DUMP: Dumping /dev/ada0p2 (/bootdir) to standard output
DUMP: mapping (Pass I) [regular files]
cannot open /dev/tty: Device not configured
DUMP: mapping (Pass II) [directories]
DUMP: estimated 1336205 tape blocks.
DUMP: dumping (Pass III) [directories]
DUMP: dumping (Pass IV) [regular files]
warning: ./.snap: File exists
DUMP: DUMP: 1337252 tape blocks
DUMP: finished in 135 seconds, throughput 9905 KBytes/sec
DUMP: level 0 dump on Wed Apr 13 11:52:12 2016
DUMP: DUMP IS DONE
toriyu# mount /dev/ada0p2 ← /etc/fstabに書いてあるのでこれでマウント可能
toriyu#
toriyu10# ls -aF /mnt
./                   dev/                    restoresymtable
../                     etc/                    root/
.cshrc                  lib/                    sbin/
.profile                libexec/                sys@
.snap/                  media/                  tmp/
COPYRIGHT               mnt/                    usr/
bin/                    proc/                   var/
boot/                   rescue/
toriyu10# sync
toriyu10# umount /mnt
かくして、差し替えさえすれば動作するHDDが出来上がりました。工事が終わって部屋に入れるようになるまでに FreeBSD のセキュリティ更新やアップグレードがあるとコピーをやり直さなくてはならないのですが、その時は上記メモが大いに役に立ってくれることでしょう(笑)。